Showing posts with label Dollar Store Finds. Show all posts

Friday, January 25, 2013

Cork Board Lined Kitchen Cabinets

I've seen all over Pinterest lately how different people were putting cork board up in their kitchen cabinets. 
I thought this was such a great idea! 
You can put recipes, shopping lists, receipts, coupons, and basically anything on those boards and its conveniently in your cupboard and not scattered on your counters. 
I immediately wanted to do this project, but knew I didn't want to pay an arm and a leg. 
So I headed to my local dollar store to see what supplies I was able to purchase there before I looked anywhere else. 

Supplies ; 
Cork Boards (I found a 2 pack at the dollar store for $2.00) 
Mounting Tape (dollar store $1.00) (still lots left!)

I measure my cabinets before hand to make sure there wasn't going to be any cutting needed or that the cork boards would interfere with closing the doors.
I was lucky that no cutting was necessary! 

I placed 5 pieces of mounting tape on the back of the cork board.
In the four corners and one in the middle. 
I stuck them to the door and pressed hard to get them to stick. 
I recommend leaving them for at least 30 minutes so they have time to really stick to the door. 
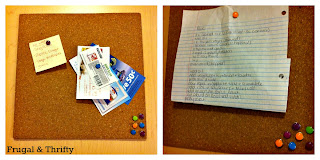
All Finished! 
So Practical!

Sunday, January 6, 2013

DIY ~ 12 Section Scarf Holder

My scarves seem to be taking over my life lately! 
I decided that it was finally time to organize them properly. 
When I was looking into buying a hanger specifically designed for scarves, they were anywhere from $10 to $25 dollars! Ridiculous prices if you ask me. 
I decided I would make a special hanger myself, and was please to discovered that the final cost was under $2.00. 
 
Hanger ~ on hand ( I recommend using a thicker, more heavy duty hanger or it will begin to drop with the weight of the fabric. 
Shower Curtain Rings ~ $1.25 for 12 at my local Dollarama 
Ribbon ~ $1.00 (did not use it all) 

Firstly, I suggest you clip all the rings closed. 
Next, line your rings in a single line beneath the bottom on your hanger. 
Then tie strands of ribbon from the ring onto the hanger. 
Do this for every ring. 
Once you have your first layer attached to the hanger, then tie ribbons from ring to ring to connect them and make it so they don't slip. 
Next add another layer of rings, tying ribbon to the other rings to hold them in place. 
Do this until you have used all 12 shower curtain rings. (yes, I am aware only 9 are pictured. The other three were added after) 
I don't recommend having more then 12 rings on one hanger because the weight of the scarves can cause the hanger the droop and it could break if there was too much weight. 

Finished Hanger. 

It holds all my scarves and there are still some empty spaces. I guess this means I need to go scarf shopping!


Make Up Brush Holder

If you're anything like me, your make-up is in every room of the house scattered everywhere. 
I wanted to make a place specific for my make up brushes that would look nice enough 
that it would be able to sit on the bathroom counter. 
I think I found a happy medium with this organizer. 

I choose blue decorative sand so it would match the decor of our bathroom. 
I already had the candle holder on hand, but I saw similar ones at my local dollar store for $2.00. I also purchased the decorative sand for $1.25. I only used about a third of it, leaving leftovers for other projects.

Simply wash out your candle holder if it has been used and dry it completely. 
Pour your sand or vase filler into your holder, adding as much or as little as you want. 
You basically want enough to hold the weight of your brushes. 

The Finished Product.
I love the way this looks on our counter. Its simple, and cute. You can use your brushed then put them right back with no worries. 
This holder turned out so well that I am thinking of making a similar one for all my lip glosses! 
Photos to come when they are made!

Tuesday, January 1, 2013

Tips For Creating a Photo Wall

*Work In Progress ~ Check Back For Updates!*

In our home there is a semi-long hallway connecting the living area with the bedrooms and bathroom. 
This wall is very plain and was in desperate need of something to make it look more interesting. 
Ideally I would have loved to have painted this wall before creating the photo mural, but we aren't currently aloud to paint. 
 
 
Tip # 1 ; 
Pick A Focal Point 
I chose this large multi-photo frame that I purchased from Walmart for $10.00. It holds fifteen photos total and is a great starting point for this wall. 
I chose black because I wanted everything to pop on the light colour of the paint. 
In this frame I have photos of my childhood family vacations mixed with photos of my life now. 
It is kind of a look into the past and the present. It is cool to see how different my life is now and how much my family has grown. 
 
*Note ; the wooden 'believe' is not attached to the frame. It is separate. * 
 
Tip # 2 ; 
Don't Hang Things Right Away 
This is a big tip. Before commiting to a spot for a photo you want to hang, try it out. 
Bust out the scotch tape and put a little piece on the back and stick it where you think it will look good. 
This way you can try many different combinations before ultimately deciding on your favourite place to hang it up.

Tip # 3 ; 
Don't Put Anything Big On The Opposite Wall 
Because it is such a thin hallway, I don't recommend putting anything large or loud on the opposite wall. This will make your hallway seem smaller than it really is. 
I chose one of my favourite quotes, 'dance like no one is watching'. 
I actually found this sticker quote at my local dollar store for one $1.00 awhile back. 


As you can see, this wall is still a work in progress. 
There will be frequent updates over the next couple of months,
so stay tuned! 

Saturday, December 8, 2012

Dollar Store Finds December 08.12

I was doing some shopping in my local dollar store today and I thought I would share with you some of the great finds I came across!

Glass oil container for my counter. Love this! I have been wanting and oil 
jar but they are so expensive! This baby was only $2.00! What a steal!

Vase and branches for on top of dresser. This fits perfectly into the decor of
our master bedroom. The vase was $1.00 and the branches were $2.00. For a 
grand total of $3.00 I am loving this! 

After reorganizing our kitchen counters I realized we no longer had 
a place to keep our bread products. I saw this at the dollar store 
and knew it would match perfectly. It was only $2.00. 

I found this Wilton brand cake cutter at my local dollar store and knew 
that it would be a savior when it came to cutting cakes! 
It has different knotches on the side to adjust the height of the cake 
and it slides perfectly across the cake with ease. I speak from experience! 
It was only $2.00! I saw something similar for $15.00 at Walmart!